Before and After Photos That Actually Get You Clients
Your portfolio is your best marketing tool. Learn how to take before and after photos that showcase your work and convert browsers into bookings.
Sarah Mitchell
Content strategist with a passion for helping businesses grow.

Your best marketing isn't ads. It's proof.
And nothing proves your skills like great before and after photos.
But here's the problem: most stylists, barbers, and nail techs are taking photos that actually hurt their business. Bad lighting. Inconsistent angles. Cluttered backgrounds.
This guide will fix that.
Why Before/After Photos Matter
The numbers:
- Posts with before/after photos get 2-3x more engagement
- 78% of potential clients check Instagram before booking
- Portfolios are the #1 factor in choosing a new stylist
The psychology:
- Transformations are satisfying to look at
- Before/afters prove what words can't
- They answer: "Can this person do what I want?"
Your photos are doing the selling while you're cutting hair.
The Fundamentals
Consistency is Everything
The most common mistake? Random photos that don't match.
Every before/after pair should have:
- Same angle
- Same distance
- Same lighting
- Same background
- Same crop
When these match, the transformation pops. When they don't, the photo looks amateur.
Lighting: The Game Changer
Natural Light (Best Option)
Do:
- Face your client toward a window
- Shoot during daylight hours
- Overcast days = soft, even light
- Morning or late afternoon = warm tones
Don't:
- Shoot with window behind client (silhouette)
- Use direct harsh sunlight (shadows)
- Mix natural and artificial light
Ring Light (Consistent Option)
Why it works:
- Even, shadowless lighting
- Consistent regardless of time
- Makes colors pop
- Catches hair shine beautifully
Setup:
- Position ring light directly in front
- Client faces the light
- Camera shoots through the ring
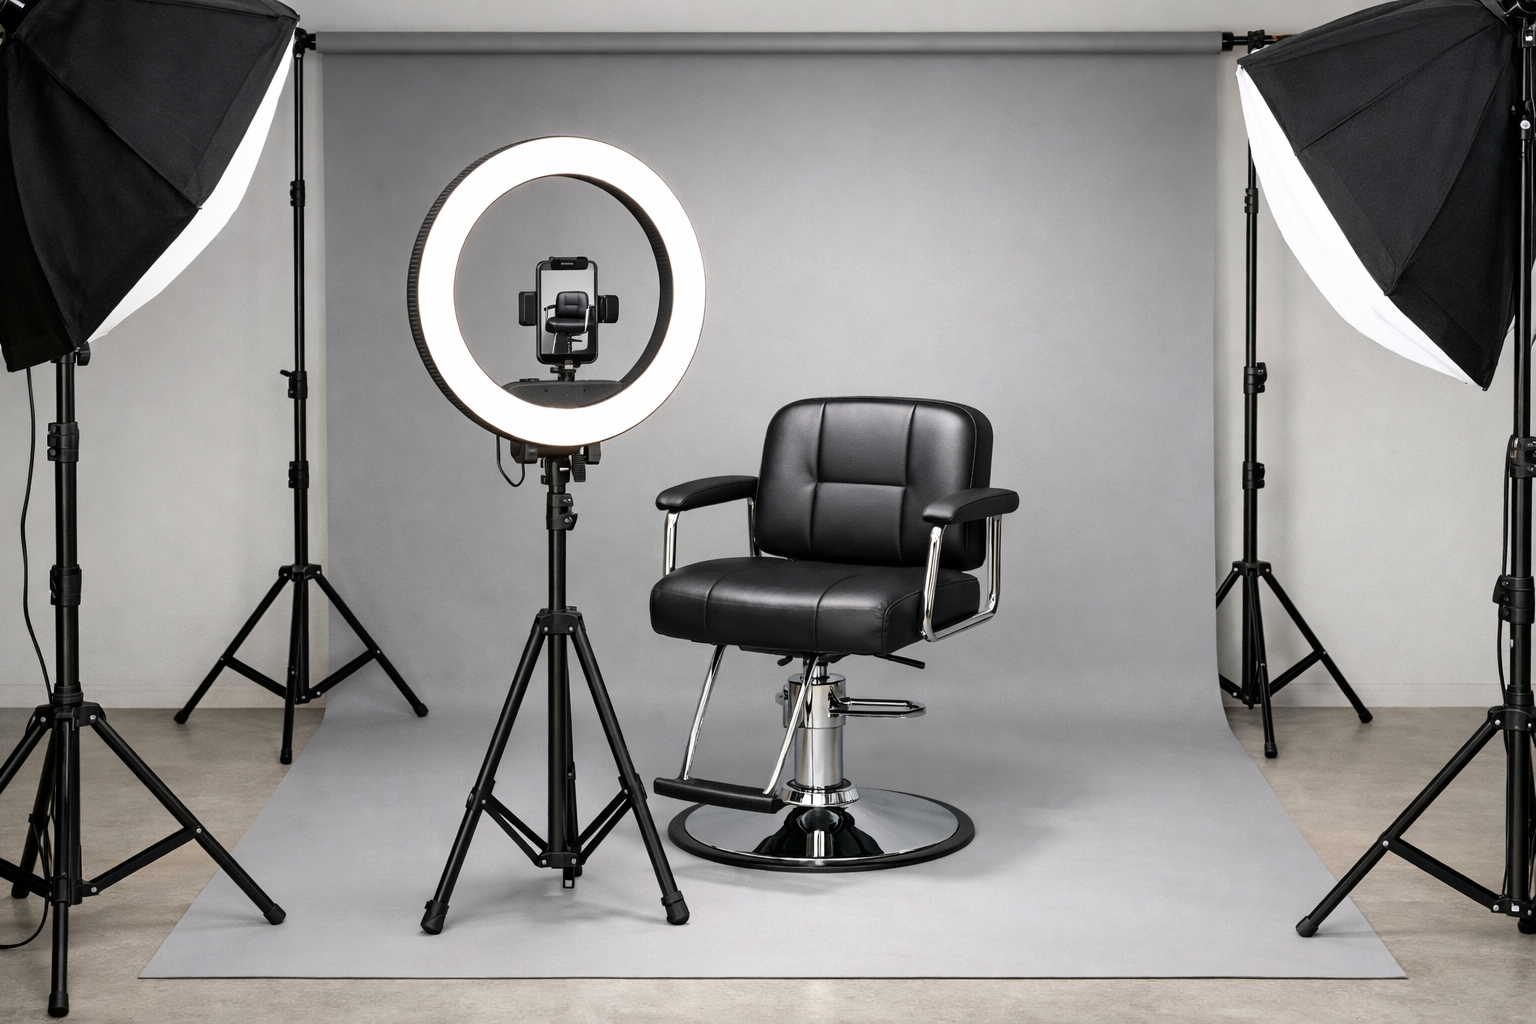 A proper ring light setup: light in front, phone shooting through the center, clean backdrop behind.
Investment: €50-150 for a good ring light. Worth every cent.
Salon Lighting (Use Carefully)
Most salon lighting is designed to flatter clients, not photograph work.
Common problems:
- Warm bulbs distort color (bad for showing blonde tones)
- Overhead lights create shadows under hair
- Mixed color temperatures look unprofessional
Fix: Dedicate one spot in your salon with consistent, photography-friendly lighting.
Angles That Work
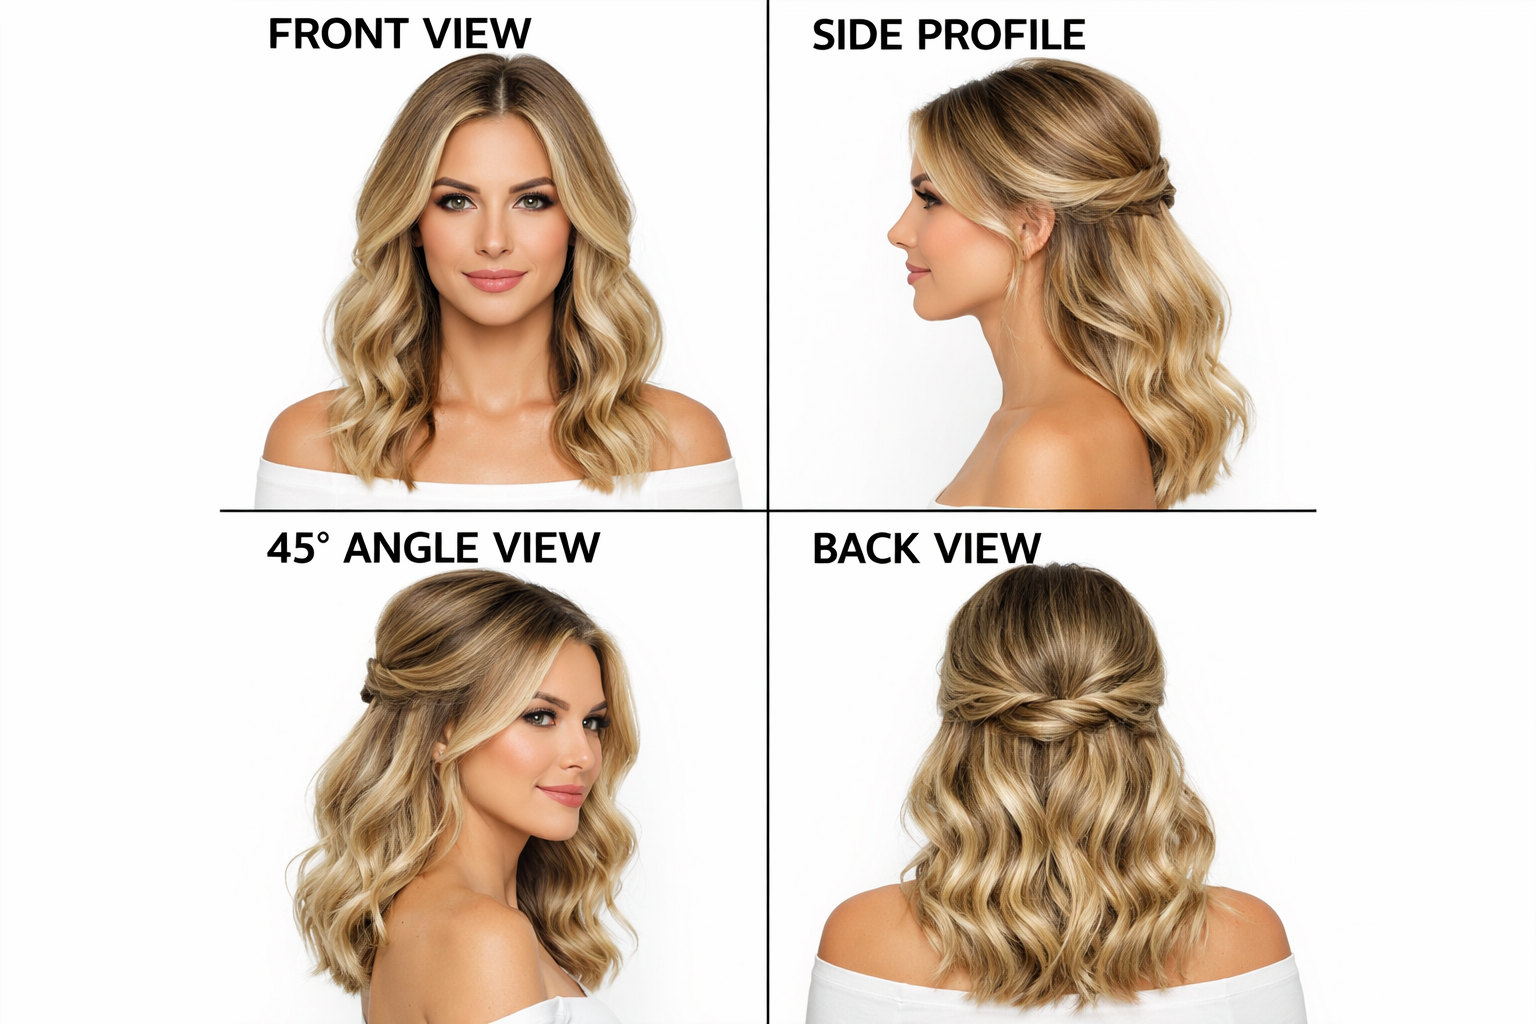 The four essential angles: front, side profile, 45-degree, and back view.
For Haircuts & Styling
Essential angles:
- Front - Shows face framing, overall shape
- Side profile - Shows layers, length, graduation
- Back - Shows shape, balance, detail work
- 45-degree - Most flattering, shows dimension
Pro tip: For dramatic transformations (big chop, major color), the front view is most impactful.
For Barbering
Essential angles:
- Side profile - Shows fade quality, lineup
- Back - Shows taper, blend quality
- 45-degree front - Shows overall shape
Pro tip: Get close enough to show the technical work. Don't stand too far back.
For Nails
Essential angles:
- Fingers flat, straight down - Classic portfolio shot
- Curved hand - More elegant, shows shape
- Close-up detail - Shows nail art precision
Pro tip: Consistent hand positioning matters more than you think. Develop your signature pose.
The Background Problem
What Kills Photos
- Cluttered salon visible behind
- Other clients in background
- Messy stations
- Inconsistent backgrounds between before/after
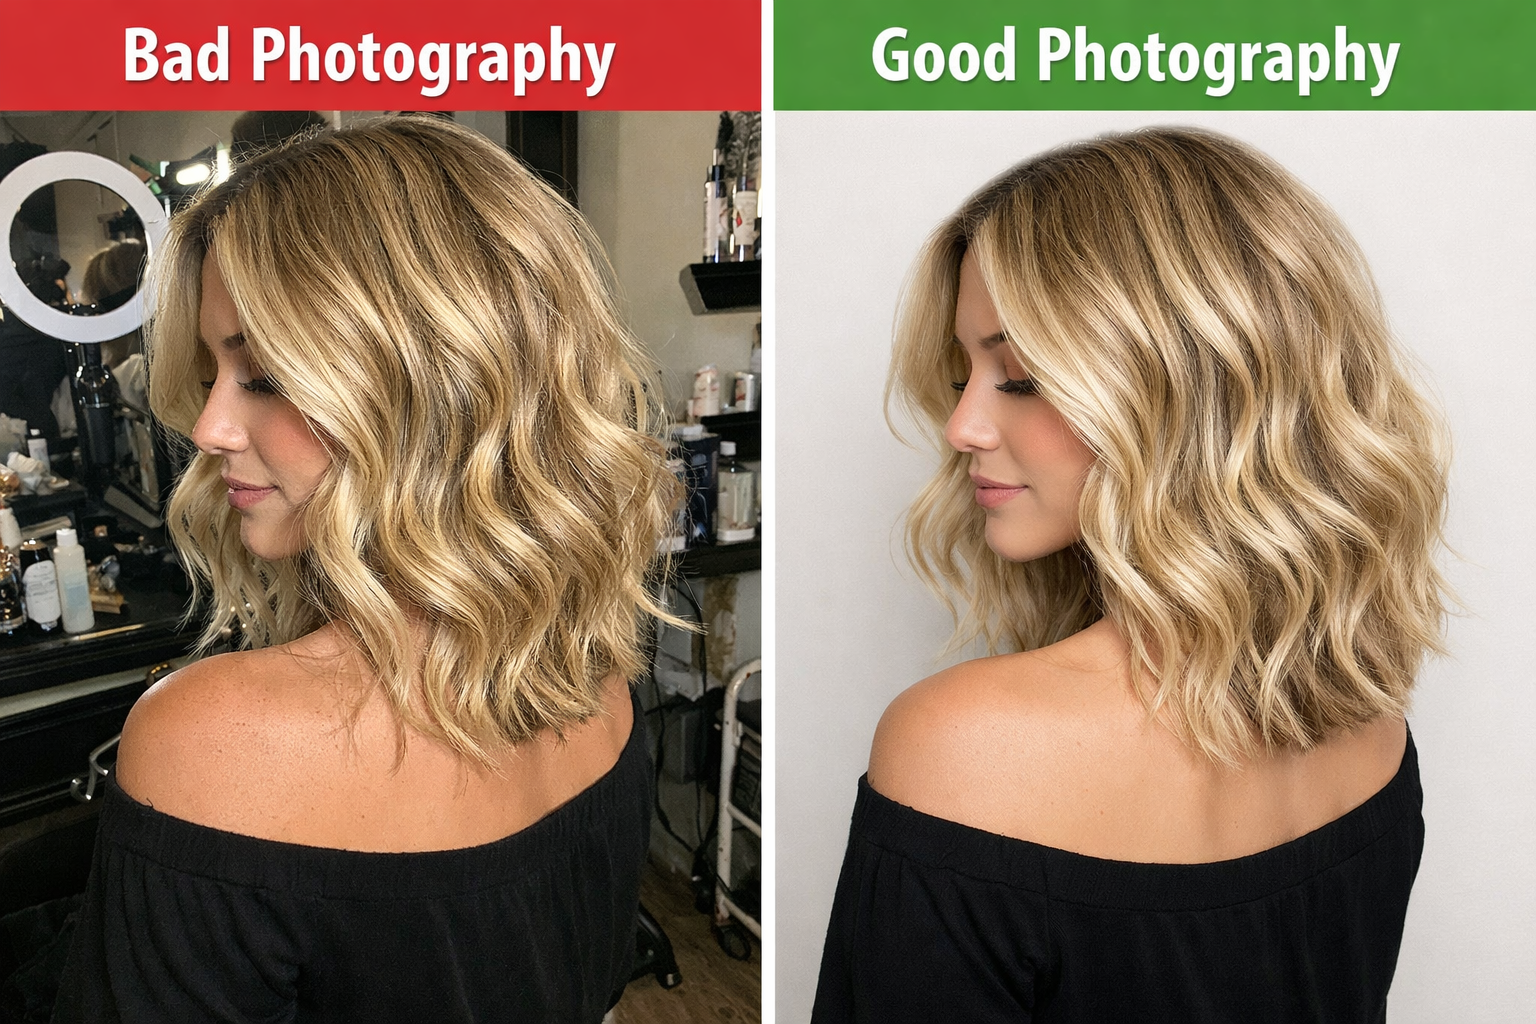 Left: Cluttered background ruins the shot. Right: Clean, neutral background lets the work shine.
Solutions
Option 1: Dedicated photo spot
- Clean, neutral wall
- Consistent lighting setup
- Same location for all photos
Option 2: Plain backdrop
- Invest €30-50 in a collapsible backdrop
- White, grey, or black
- Easy to set up anywhere
Option 3: Blur it out
- Portrait mode on newer phones
- Opens up aperture, blurs background
- Not as good as a clean background, but works
Step-by-Step: Taking Great Photos
Before the Service
- Ask permission - Always get consent for social media use
- Find your spot - Consistent location with good lighting
- Position client - Same distance from camera, same angle
- Check background - Clean and consistent
- Take multiple shots - Different angles, pick the best
After the Service
- Same spot, same setup - This is crucial
- Style the finished look - Make sure it's camera-ready
- Match the before angle exactly - Side by side comparison should be seamless
- Multiple angles - Capture front, side, back
- Detail shots - Close-ups of technique
The Phone Setup
Camera settings:
- Use the back camera (better quality)
- Portrait mode for background blur
- Turn OFF flash (harsh, unflattering)
- Clean your lens (fingerprints = haze)
Grid lines:
- Turn on camera grid
- Use it to keep shots level
- Position eyes at same grid point every time
Editing: Less is More
Good Editing
- Adjust brightness and contrast
- Correct white balance (color temperature)
- Crop consistently
- Light sharpening
Bad Editing
- Heavy filters that distort color
- Over-smoothing skin
- Changing hair color with filters
- Making photos look nothing like reality
The rule: Your photos should look like what clients get when they visit. Over-edited photos = disappointed clients = bad reviews.
Recommended Apps
Free:
- Snapseed (excellent basic editing)
- VSCO (consistent presets)
- Lightroom Mobile (professional features)
For creating before/after comparisons:
- Canva (easy side-by-side layouts)
- InShot (video and photo)
- Layout from Instagram
Creating the Comparison
Side-by-Side Layout
The standard:
- Before on left, after on right
- Same size, same crop
- Thin dividing line or small gap
- "Before" and "After" labels (optional but clear)
Tools: Canva templates, Layout app, or Instagram's built-in collage
Slider Reveals (Video)
More engaging than static images:
- Show before, slide to reveal after
- Works great for Instagram Reels
- Creates anticipation and satisfaction
Carousel Posts
Show the full story:
- Before (front)
- After (front)
- Before (side)
- After (side)
- Detail shot
Carousels get more saves and shares than single images.
Getting Client Permission
What to Say
"I'd love to take some photos for my portfolio. Would you be comfortable with me sharing them on social media?"
Most clients are flattered. Especially if the result is good.
Best Practices
- Ask before taking photos
- Offer to show them the post before it goes live
- Never post without clear permission
- Consider a simple consent form for your records
- Tag them if they want (some prefer not to)
When Clients Say No
Respect it. Some people have privacy concerns, aren't happy with the result, or just don't want to be on social media.
Never push. Move on.
Building Your Portfolio
Variety Matters
Show a range of:
- Hair types (straight, curly, coily, thick, thin)
- Ages (young, middle-aged, older)
- Styles (classic, trendy, bold, subtle)
- Services (cuts, color, styling, treatments)
- Genders (if you serve all)
Quality Over Quantity
10 excellent photos beat 100 mediocre ones.
Curate ruthlessly. Your portfolio is only as good as your worst photo.
Highlight Your Specialty
Known for balayage? Show lots of balayage. Master of fades? Lead with your fades. Nail art expert? Make that obvious.
Platform-Specific Tips
- Use carousel posts for before/afters
- Reels with reveals get more reach
- Consistent grid aesthetic builds trust
- Use relevant hashtags (#beforeandafter, #hairtransformation)
TikTok
- Transformation reveals perform extremely well
- Sound matters - use trending audio
- Keep it under 15 seconds for best performance
- Show personality alongside the work
Google Business Profile
- Upload your best work regularly
- These photos appear in local search
- Categories: "Hair Salon" photos get seen by people searching
Common Mistakes to Avoid
- Different angles before/after - Makes comparison impossible
- Bad lighting - Doesn't matter how good the work is
- Cluttered background - Distracts from the transformation
- Over-editing - Looks fake, creates distrust
- Posting without permission - Can damage your reputation
- Only posting dramatic changes - Subtle improvements matter too
- Forgetting to take the before - We've all done it. Set a reminder.
Your photos are working 24/7
While you're sleeping, your portfolio is convincing someone to book.
While you're with a client, your Instagram is building your next client's trust.
While you're closed, your Google photos are showing up in searches.
Invest in getting this right. It compounds.
👉 Vinci 26 helps salons and barbershops turn great work into a thriving business - from booking management to client retention.
Build something that's truly yours.
Enjoyed this article? Share it with others.
Related Articles

Adding Skincare Services to Your Barbershop: A Practical Guide
Men's skincare is booming. Here's how to add facials, treatments, and skincare consultations without a complete shop overhaul.

Mobile Barbering: Taking Your Chair to the Client
Home visits, corporate events, on-location cuts. Here's how to build a mobile barbering business that works.

The Berlin Barbershop Scene: A Neighborhood Guide for Owners
Berlin's barbershop culture is as diverse as its neighborhoods. Here's what makes each area unique—and where the real opportunities are.